Wednesday, July 8, 2009

Stuffed Chicken


With time on my hands and a gastronomically inclined mind, I decided to go into the kitchen again this week. I've been having fun learning how to cook new dishes. However, tonight I didn't learn a new dish. I simply took chicken out and started adding different elements to it. Let's start with the main component; the chicken and its stuffing: Preheat the oven to 400 degrees

Ingredients Needed:
Chicken breasts (on the larger side preferably)
Half package frozen, chopped spinach
One or two large mushrooms, finely chopped
Quarter of red, yellow, or orange bell pepper
2 garlics cloves, finely diced
Jalapeno, finely diced
Feta cheese
Italian spices

Preparation:
1) Cut the chicken, making it thin and wide. There should be two cuts that result in the chicken breast looking like a trifold wallet when opened up.
2)Saute the finely chopped vegetables in 1 tbsp of butter, adding generous amounts of the herbs and spices. I am keen on using more than most people would think appropriate because I love bold flavors.
3) Leave sautéed vegetables off to the side in order to cool down so that the feta cheese can be added.
4) Add feta cheese to the cooled mixture and spoon into the center of the opened up chicken breast.
5) Fold the two sides of the chicken breasts to the center, creating the stuffed effect.
6) Liberally sprinkle more of the spices and herbs on the top of the chicken breast.

After preparing this, I then started making the sauces. I'll start with the green sauce.

Ingredients:
Second half of frozen, chopped spinach
4-6 stalks of asparagus
2-3 jalapenos (i tend to like food much spicier than others do so adjust for yourself)
salt, to taste
pepper
2 tbsp milk
olive oil (to help make sauce a liquid)
2 cloves garlic

Preparation:
1) Add all ingredients to blender and begin on a slow setting to blend everything together, slowly increasing the speed of the blade while wiping down the edges.
2) add olive oil as needed to help smooth out the texture
3) adjust flavors until you like it
4) Once a smooth mixture, pour sauce into sauce pan to cook over medium on the stove for 5-10 minutes

To make the orange sauce, here are the ingredients:
1 whole orange bell pepper (can substitute for red or yellow)
1 tbsp cayenne pepper (90,000 scoville units)
4 cloves of cardamon
Olive Oil
Salt, to taste


Preparation:
1) roast the bell pepper on your stove or in your oven on broil setting. When skin becomes loose, peel the skin off.
2) Roughly chop the pepper and put it into the blender with the rest of the ingredients
3) Blend until smooth sauce


At this point, you should have the two sauces made and the chicken breasts prepared. The oven should be preheated to 400 degrees. So, place the chicken breasts on a rack with a drip pan below. Let it bake until almost done. I'm not sure how long it took so check on it periodically. When it is almost done, switch the oven setting to broil for the last few minutes to give the top a golden color.

Now, at last, everything is complete! Enjoy!

Monday, June 29, 2009

Vietnamese Spring Rolls


Well, for my first post, I figured I'd post what I ate for dinner tonight! It's one of my go-to snacks and meals. Making the vietnamese spring rolls are easy, healthy, and definitely delicious!

I first learned how to make this from my ex-girlfriend, who taught me several vietnamese dishes, this always being one of my favorites! However, I tend to make it in a little less of a traditional fashion than she did and probably many vietnamese people do. In any case, I enjoy making often and in many different varieties! I vary the rolls by what the ingredients are that include in the wrappers. Here are the ingredients that I used today (ones at the top of the list r the necessary, then the typical, and then ones that I personally like):

Ingredients
1 pkg spring roll wrappers (easily purchased at most general grocery stores)
1 pkg rice vermacelli
vietnamese mint (also called chinese basil as well other names)

Chicken/Pork/Shrimp/Beef
Bean Sprouts
Romaine Lettuce
Green onion (scallion)

Tomato (very thinly sliced)
Green/red/yellow pepper
jalepeño thinly sliced

Procedure
The most important thing in your prep is to have everything ready at the same time. This way the freshness of your ingredients is ensured. With that said, the first thing you should do is put two pots of water up to boil. In the first, add a healthy serving of salt. This will be the pot in which you boil your chicken, shrimp, and/or pork. If you choose to use beef, I recommend a little grill action making sure to to not grill past medium-rare. Anyways, in the second pot, add a good amount of oil (whatever kind you prefer). This pot will be the one in which you will boil the vermicelli.

During the time that it takes the water to boil and the protein and noodles to boil, you will be preparing all of the vegetables. Slice everything into strips and if not possible, simply thin enough to work well when wrapping. Use your own judgement. Place everything into piles on a cutting board or however you choose to lay it out.

When the chicken is fully cooked, extract it from the pot and slice this into strips as well. When the vermicelli noodles are fully cooked, drain it into a colander and rise the noodles with cold water. Place both of these on your cutting board or whatever you've chosen. Below is a picture of how I have my counter set up in order to make the rolls. On my cutting board, I have everything

In the background you can see that I have a plate. It has water filled to the top of it. This is in order to dip the rice wrapping papers to make them pliable. After soaking for about 30-60 seconds, it should be workable. Lay the wrapper out flat and the first ingredient to put down is the vermicelli. This helps the rolls have a better subtenant texture when you bite into it. After this layer, put in whatever and however much you want. Be sure to not stuff it so much that you cannot close the wrapper!


After placing all of the ingredients into the wrapper that you have chosen, lift the bottom of the wrapper and place it over and beyond all of the ingredients. Tighten your fold and roll it away from you one half turn so that the tip of the rice paper that you previously folded up is now tucked underneath. Fold botht he left and right side in.

At this point, all you have to do is roll it up, and you are finished!

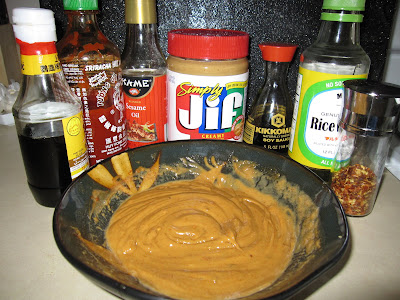
You might also be interested in the dipping sauce. There are two traditional kinds. One is a peanut sauce and the other is a fish sauce mixed with several spices. I made the peanut sauce tonight. It's quite simple. Below is a picture of the sauce as well as all of the ingredients.
The two main ingredients are peanut butter (crunchy or smooth) and soy sauce. After that, everything else is to your taste. I used rice vinegar, shrachi sauce, fish sauce, sesame oil, red pepper flakes, and red chili powder. Stir and enjoy!!

Friday, June 19, 2009

Burgercakes!

I'm not much of a baker, but if I were, I'd be making these for dinner every week.

Sunday, June 7, 2009

red radish photoshoot

Just got a new camera a few days ago, and it seemed like the perfect excuse for my first post on this blog.So, how do the pictures look?

The recipe itself is pretty simple, and the flavors are good. The cooling cream cheese really balances out the peppery taste of the raw radishes.

Red Radishes with Chives and Cream Cheese
Red radishes
Chives
Cream cheese
  1. Chop the chives, and mix in with the cream cheese. I used a lot of chives, roughly the same in volume as the cream cheese.
  2. After cleaning the radishes, slice them radishes in halves.
  3. Spread cream cheese on the radishes, sprinkle on salt and pepper, some more chives, and enjoy!

Friday, May 22, 2009

foodnomnoms on restaurant city


The idea of my blog actually came from a little Facebook game called Restaurant City. Heard of it? It's taking the Facebook world by storm. You should play. You start with a tiny little restaurant with 3 chairs and 2 workers (1 chef, 1 waiter). The objective of the game is to level up your restaurant so you can get a bigger store, more workers, and more monies in the bank. You collect and trade ingredients to make and level up your dishes in your menu. You serve 1 appetizer, main entree, and dessert dish. By levelling up your dishes, you gain more points from your customers. Sweet. If you look at the top right-hand corner of the picture, you can see that my restaurant has achieved the highest 50.0 popularity points. Because I am awesome.

Anyway, I started out the game by naming my restaurant Meateating Cow. I am a cow, and I thought it'd be funny to have a cannibalistic cow. Steak... After a while, I tired of the Meateating Cow name. Especially when I kept thinking I should be serving dishes with steak but I didn't have the ingredients for them. Meateating (I keep accidentally typing Meating) Cow was changed to Foodnomnoms. Because food should be nomm-ed. And the little characters totally look like they are nom-ing the food when they eat. And because I had recently seen this video. Such a catchy little tune.

And this is how this food blog came to be named FoodNOMNOMs.


Nomnomnoming-ly,
Carolyn

Tuesday, May 19, 2009

my bun cha (vietnamese pork w/ vermicelli) experiment

Moving posts from my regular blog on here where they belong!

Bun cha is one of the simplest Vietnamese dishes to make - it is grilled meat (usually pork) and greens (butter lettuce, mint, shredded cucumbers and carrots, etc) over dry vermicelli noodles. It's served with nuoc cham (sauce). I really liked the recipe I used! It tasted just like how the restaurants' make it.

Originally written 5/9/09
Last week, I saw that a friend was attempting to make this, and was inspired to try it as well. I love Vietnamese food - pho has always been one of my passions...my mother says I must have been Vietnamese in my past life. Which isn't such a stretch, I guess...actual Vietnamese ladies think I'm Vietnamese too. Like that one time I went up to the register to pay and the lady behind the counter started speaking to me in Vietnamese. And I smiled politely and told her sorry, no habla Vietnamese!

Anyway, back to the subject! Found this recipe online and happily set out prepping the night before my midterm. Needless to say, not much studying was done, but I did manage to finish the marinade for the pork and the nuoc cham (sauce) that night.

The next day came and I finished making the whole thing that night! Cooked the pork (no grill for me, unfortunately), noodles, washed the bean sprouts and mint, cut the carrots and threw everything together.


Great success!

Nomnomnoming-ly,
Carolyn

my 炸醬麵 (zha jiang mian) recipe


After promising Michael for a year that I would post this recipe and forgetting to each time I suddenly remembered my promise, I'm finally sitting down and getting it done! He even took pictures as I was making it one day...so I figure it's the least I could do. Note: the above picture is courtesy of Nibbledish...I wish my food could look as appetizing as this!

As this is my first recipe writing session, excuse the noobiness of directions and culinary terms.

Zha jiang mian, or noodles with fried bean and meat sauce in English, has been deemed "Chinese spaghetti" by some. Pretty self explantory - minced meat in soybean and hoisin sauce over a bowl of noodles. My mom actually taught me this recipe over the phone last year and I've modified some things as I go.

Ingredients:
1 clove of garlic, minced
1 lb. ground pork
1/2 an onion, diced
5 spoons sweetened soybean paste (甜麵醬 tian mian jiang)
5 spoons hoisin sauce (海鮮醬 hai shian jiang)
Dabble of soy sauce
2 blocks dried tofu (豆乾 dou gan), cubed
Handful of bean sprouts
1 stalk green onion, chopped
2 clumps of noodles

Optional: shredded cucumbers, carrots (to be added raw to the dish), chili sauce


Stir fry garlic, ground pork, and onions in a pan (remember to use a generous amount of oil).
When the meat is cooked through, mix in the sauces (though I say 5 spoons of each, do it to your own taste - I tend to like putting in more hoisin sauce for a sweeter sauce), and fried tofu. Mix everything thoroughly, then throw in the bean sprouts and green onions. Cook the noodles and throw it in a bowl with a clump of the zha jiang.

Tadaa! No top marks on presentation, but dang is it tasty...if I do say so myself!


Nomnomnoming-ly,
Carolyn